How to Add Expenses
How to Add an Expense
The Add Expense feature allows restaurant owners and managers to record daily operational costs such as purchases, salaries, utilities, rent, and maintenance. Maintaining accurate expenses helps track profitability and manage finances efficiently.
1. Steps to Add a New Expense
- Navigate to Expenses → Expenses from the sidebar.
- Click the Add Expense button.
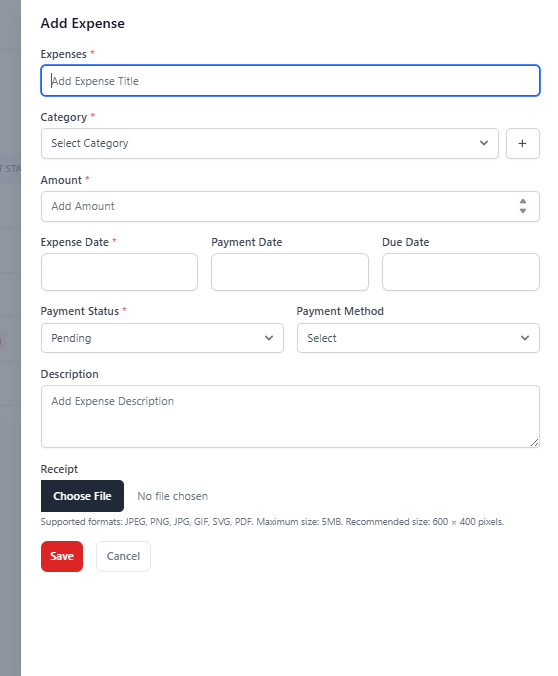
- The Add Expense form panel will open.
- Fill in all required expense details.
- Click Save to record the expense.
2. Expense Form Fields Explained
Expense Title
Enter a clear name describing the expense (e.g., Electricity Bill, Vegetable Purchase).
Category
Select an appropriate expense category such as Rent, Utilities, Ingredients, or Salaries. Categories help organize financial reports.
Amount
Enter the total amount spent for the expense.
Expense Date
The date when the expense occurred.
Payment Date
The date when payment was made (optional if unpaid).
Due Date
Used for pending payments or scheduled expenses.
Payment Status
- Paid — Expense has been completed.
- Pending — Payment is yet to be completed.
Payment Method
Select how the payment was made:
- Cash
- Debit/Credit Card
- Bank Transfer
- UPI / Online Payment
Description
Add additional notes or details related to the expense.
Receipt Upload
Upload invoice or receipt proof (JPG, PNG, PDF supported).
3. Best Practices
- Always attach receipts for accounting accuracy.
- Use correct categories for better reporting.
- Update payment status once payment is completed.
- Record expenses daily to avoid data loss.
Why Adding Expenses is Important
- Tracks operational costs in real-time.
- Improves financial transparency.
- Helps measure business profitability.
- Supports tax and accounting processes.
- Enables data-driven business decisions.